

 07.27
07.27
 fandy
fandy
1. Background blur
- Create a selection object
- Select feather 1-4, 2-6 smooth
- Select layer via copy ato press Ctrl + J
- Hide layer
- Select the background layer
- Select a filter - gaussian blur 6-10
- Activate the hidden layer had
2. Creating a comic drawing / cartoon of a photo with the filter
- Open the image file
- Select a filter - artistic - poster edges
- Select brightness 10, contrast 30
- Select Filer - artistic - cut out
3. Creating a shadow of the object
- Create a selection object
- Select layer via copy ato press Ctrl + J
- On a new layer, select edit - transform - flip vertical
- Move it to the bottom of the object
- Choose edit - distort to set high shadow
- Go into quick mask mode
- Refine the image by removing unwanted bagian2
- Exit the quick mask mode
- Set layer opacity 40%
4. Highlight color partially
- Create new adjustment layer -> hue - saturation
- Make sure the colorize option checked, set his Hue
- Select a hue-saturation layer, select brush tool, use this tool to create the desired color from the
5. Create an atmosphere of night
- Copy of the background layer
- Duplicate the layer to new layer
- Choose a new layer - Image-Adjust-Desaturate
- Select image - adjust - curves, click on the tengah2, and enter input values: 215 and Output: 158
- Select image - adjust - level
Input Levels 0 1.00 255
Output levels 0170
- The layer blending mode, select Multiply
6. create the effect of folded pages
- Create a new document, 200 x 250 pixel resolution 72, create a new layer
- Dg fill the desired color, eg R: 255 G: 255 B: 0
- Click the line tool, create a diagonal line from the lower left corner 30 degrees to the right
- At the bottom, use the magic wand select select, modify, expand by 1, then delete
- Use the polygonal lasso tool to form an upper fold
- Open the paths palette, click the small arrow icon, select Make Work Path
- Select the Convert Point Tool in the Pen Tool
- Click on the path, it would seem Anchor Points and Direction Lines
- Click and drag on the edges to create a curved effect
- On the path palette, click the small black arrow, and select Make Selection, Feather Radius = 0, Anti-Alias option = ON
- Delete the path that had been made
- Select linear gradient tool, linear gradient palette to open, edit the colors to be used
- Use color gradients to fold paper menggradasi
7. change the color of some object
- Copy layer, duplicate layer into a new
- Select Image - Adjust - replace color
- Change the Hue and Saturation to change his, such as Hue 120 and Saturation =- 44 =-
- Select the eyedropper +, click on the object to be colored bagian2
- Change fuzinnes slider to 60
- Use a layer mask to remove excess color / jembret
8. folding photo
- Open the image files, create layer from background
- Use the polygonal lasso tool for selection of parts to be folded
- If already selected, simply cut those sections
- Paste in new layer, it would appear that had been part dicut
- Select edit-transform, then flip horizontal and flip vertical. use the rotate if necessary
- Put in the correct position
- Selection of which will be curved, again with the polygonal lasso tool
- Choose the path palette, and press the little arrow icon, and select make work path
- Use the convert point tool and click on the path
- Adjust the angle of curvature corresponding
- Choose the path palette, and select the make selection
- Remove paths
- Delete the selection
9. create TV scanlines effect
- Create a new transparent document 1 x 3 pixels
- Second pixel fill with black color
- Click edit - define pattern
- Open the image that will be given effect
- Choose edit - fill, select a new pattern that we created earlier
- Set opacitynya to 50% - 30%
10. create a torn photo effect
- Open the image files we
- Use the Pen Tool, then create a path on which we will create part was quite. if necessary, we zoom to 300% in order to make a smooth tear effect. advised to make torn from top to middle of the photo.
- Right click on the Path, and select the Stroke to Path, continue the path to form a box outside the area of the photo
- On the path palette, right click and select Make Selection
- Selectionnya copy and paste in new layer
- Press CTRL and click on the new layer to select all objects
- Select the rectangular marque tool and select the interract with selection
- Choose edit - selection, right click on the selection, select distort
- Set the distortion to create the impression of a tear (not too wide)
- Use the drop shadow effect on the blending mode for more realistic impression
- Use the magic wand to eliminate unnecessary warna2
11. create a soft focus photo effect
- Go to our image file, press Ctrl + J to duplicate the layer
- Select a filter - gaussian blur, enter 5 pixels
- Select the layer mode: Overlay
12. create a stunning effect
- Open the image and copy to new layer
- Select a filter - gausian blur, enter a pixel on valuenya 13.0
- Set layer opacity to 50%
- Create a layer mask
- Select a brush dg 50% opacity, then brush into bagian2 object that will be maintained sharpness
13. make a quick sunset with the technique of gradient maps
- Open the image file
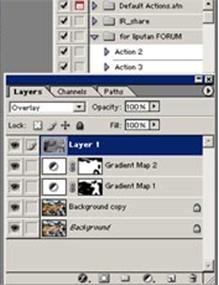
- Select new adjustment layer - gradient map
- Gradient menu will appear, select the one
- Enter the following values to set some color gradation
tab stops 1: # 000000; Location: 0%
tab stop 2: # 330000; Location: 41%
tab stops 3: # ff7c00; Location: 70%
tab stop 4: # f8eee4; Location: 100%
- When I click ok
- Set the blending mode to overlay
14. create 3D photo effects and curved
- Create new documents, we prepare a canvas for our image, gradient fills b / w
- Insert our image into the new document
- Set the blending mode - drop shadow
- Select edit - transform - perspective, set the direction in accordance with what we want
- Select a filter - distort, set the direction of the arch photo
15. Maintaining the color of objects in gray mode (black and white but there is a colored object)
- Open the image files we
- Select New Adjustment Layer - Channel Mixer
- Make sure the check box Monochrome active to make our image into grayscale
- Use a paint brush to polish the object you want displayed color
- Set opacitynya to create soft color
16. smooth the skin with the history brush
- Open the image files that will be refined
- Select a filter - gaussian blur - 8.0 pixel fill, our pictures will be blurry, while let
- Open to history, then click on the little arrow icon, select a history option, for this purpose, select the Allow non-linear history, With this, the steps that we created earlier, will not be lost
- Select new snapshot, this snapshot will become layer 'hidden', which will save the history of the gaussian blur filter that has been done previously.
- Click the new snapshot that emerged icon toolbrush history
- Still at the history, click the initial snapshot, this section MUST exist on the new snapshot
- Click the history brush tool, set the opacity to 40%, then start working the skin, set brushnya as needed.
17. make a heart shape with photographic images
- Open the image files that we want
- In the shape tool, choose the custom shape tool, make sure the choice of paths
- Select the desired shape form, eg liver
- After diapply on the layer, select Make Selection on the path palette
- Press Ctrl + X to cut options
- Open new document
- Paste form or shape that has been dicut
- Add a blending mode for the drop shadow and inner glow and finally stroke
18. turning photos into comic images
- Open the image files we
- Duplicate our layer by pressing Ctrl + J
- On a new layer, select the Color Dodge mode
- Press Ctrl + I to Inverse
- Select a filter - gaussian blur - enter the value 7
- Create a Threshold Adjustment Layer
- Enter the threshold level to 234
- Create a new layer Ctrl + Shift + Alt + N
- Change the blending mode to Multiply
- Select colors to begin painting with the brush tool
- To make titik2nya, select filter - sketch - halftone pattern, enter the value: size = 2, contrast = 50, type = dot pattern
19. create effect vehicle speed
- Open the car photo
- Duplicate the background layer
- Select a filter - motion blur, enter the number 3 on the corner, and 38 on its distance
- Create a layer mask on the new layer was
- Use the brush tool to reveal a picture of his car, while the background images will still look blur
20. make pixelate photo
- Open picture
- Duplicate the layer by pressing Ctrl + J
- On a new layer choose filter - texture - patchwork
- Enter the square size = 1, and reliefs = 0
21. copy the object by masking techniques (copying a particular section)
- Open image
- Copy layer as usual
- On a new layer, enter quick mask mode (press Q)
- Use a paint brush to paint the object to be copied
- If you've finished all, return to normal mode
- Will show the selection of the objects painted
- Press Ctrl + X or Ctrl + C to take part
22. create the effect of sunlight
- As usual, we need the image file, open file
- Create a new layer of background
- Select Filter - Render - Lens Flare
- Enter the brightness between 100-120%
- Select the appropriate type of lens
- Click Ok
23. make the fading effect
- Open the two images, eg scenery and photos closeup photos
- Insert closeup photos into the photo scene
- Use the eraser and magictool to remove the unwanted closeup photos
- Click the Add Vector Mask
- Select Gradient Tool Black to White
- Use from left to right
24. make custom brushes for abstract images
The first step, we make first brushnya
- Select new document, 500 x 500 pixel
- Select a filter - render - 3D Clouds
- Create a new layer, new adjustment layer, gradient map, select a suitable
- Select a filter - distort - Twirl, select less than 230 degrees
- Select a magic wand, tolerance 32-pixel
- Take shape as needed
- Choose select feather, fill with 6 pixel
- Select edit - define brush preset
25. The second step, the brush is ready for use
- Create a new document again
- Select a brush, set the master diameter to be 265
- Set options for shape dynamics, air brush, smoothing
- 100% set size jitter, angle jitter 100%
- Start by drawing on canvas
26. create text-style strawberry
first we make first patternnya
- Open a new file with size 100x100pixel
- Sets the fill color to D01111 and fill the new layer constrained
- Change the foreground color to be f2ea70
- Use the ellipse tool to draw a strawberry biji2
- Select blending options, outer glow, opacity set to 50%
- Duplicate layer until all the background filled with strawberries biji2
- If already selected edit-define pattern and name patternnya
27. then we will make the text
- Open a new file for example with dimensions 350x180
- Select the desired letter and make his writing
- Select a blending mode, Drop Shadow - Multiply with opacity of 30%
- Select Inner Shadow, set the color to be 870D0D
- Select Inner Glow, set the opacity to 75%
- Select bevel and emboss, select inner bevel-smooth with a depth of 100%
- Select pattern overlay, and enter the strawberry pattern that we have created earlier.
28. make gold text
- Enter the text you want and give color e1b917
- Blending modes, drop shadow, select opacitynya 50%
- Select inner shadow, modes: color dodge, color dabb0f
- Select bevel and emboss, select emboss with smooth technique with a depth of 90%, then select the shadow mode: Multiply by color 8a7410
- Select a satin, blend modes linear light with color 473b09
29. insert image in the text
the end result, our text will be colored with the image we prepared, steps:
- Open imagenya, then type any text
- On the text layer, press Ctrl + Click to select all text
- Select the image layer and press Ctrl + C and Ctrl + V
- Delete the text layer and the layer image
thanks to all who have visited this blogif there are additional you can post here

Read more »
- Create a selection object
- Select feather 1-4, 2-6 smooth
- Select layer via copy ato press Ctrl + J
- Hide layer
- Select the background layer
- Select a filter - gaussian blur 6-10
- Activate the hidden layer had
2. Creating a comic drawing / cartoon of a photo with the filter
- Open the image file
- Select a filter - artistic - poster edges
- Select brightness 10, contrast 30
- Select Filer - artistic - cut out
3. Creating a shadow of the object
- Create a selection object
- Select layer via copy ato press Ctrl + J
- On a new layer, select edit - transform - flip vertical
- Move it to the bottom of the object
- Choose edit - distort to set high shadow
- Go into quick mask mode
- Refine the image by removing unwanted bagian2
- Exit the quick mask mode
- Set layer opacity 40%
4. Highlight color partially
- Create new adjustment layer -> hue - saturation
- Make sure the colorize option checked, set his Hue
- Select a hue-saturation layer, select brush tool, use this tool to create the desired color from the
5. Create an atmosphere of night
- Copy of the background layer
- Duplicate the layer to new layer
- Choose a new layer - Image-Adjust-Desaturate
- Select image - adjust - curves, click on the tengah2, and enter input values: 215 and Output: 158
- Select image - adjust - level
Input Levels 0 1.00 255
Output levels 0170
- The layer blending mode, select Multiply
6. create the effect of folded pages
- Create a new document, 200 x 250 pixel resolution 72, create a new layer
- Dg fill the desired color, eg R: 255 G: 255 B: 0
- Click the line tool, create a diagonal line from the lower left corner 30 degrees to the right
- At the bottom, use the magic wand select select, modify, expand by 1, then delete
- Use the polygonal lasso tool to form an upper fold
- Open the paths palette, click the small arrow icon, select Make Work Path
- Select the Convert Point Tool in the Pen Tool
- Click on the path, it would seem Anchor Points and Direction Lines
- Click and drag on the edges to create a curved effect
- On the path palette, click the small black arrow, and select Make Selection, Feather Radius = 0, Anti-Alias option = ON
- Delete the path that had been made
- Select linear gradient tool, linear gradient palette to open, edit the colors to be used
- Use color gradients to fold paper menggradasi
7. change the color of some object
- Copy layer, duplicate layer into a new
- Select Image - Adjust - replace color
- Change the Hue and Saturation to change his, such as Hue 120 and Saturation =- 44 =-
- Select the eyedropper +, click on the object to be colored bagian2
- Change fuzinnes slider to 60
- Use a layer mask to remove excess color / jembret
8. folding photo
- Open the image files, create layer from background
- Use the polygonal lasso tool for selection of parts to be folded
- If already selected, simply cut those sections
- Paste in new layer, it would appear that had been part dicut
- Select edit-transform, then flip horizontal and flip vertical. use the rotate if necessary
- Put in the correct position
- Selection of which will be curved, again with the polygonal lasso tool
- Choose the path palette, and press the little arrow icon, and select make work path
- Use the convert point tool and click on the path
- Adjust the angle of curvature corresponding
- Choose the path palette, and select the make selection
- Remove paths
- Delete the selection
9. create TV scanlines effect
- Create a new transparent document 1 x 3 pixels
- Second pixel fill with black color
- Click edit - define pattern
- Open the image that will be given effect
- Choose edit - fill, select a new pattern that we created earlier
- Set opacitynya to 50% - 30%
10. create a torn photo effect
- Open the image files we
- Use the Pen Tool, then create a path on which we will create part was quite. if necessary, we zoom to 300% in order to make a smooth tear effect. advised to make torn from top to middle of the photo.
- Right click on the Path, and select the Stroke to Path, continue the path to form a box outside the area of the photo
- On the path palette, right click and select Make Selection
- Selectionnya copy and paste in new layer
- Press CTRL and click on the new layer to select all objects
- Select the rectangular marque tool and select the interract with selection
- Choose edit - selection, right click on the selection, select distort
- Set the distortion to create the impression of a tear (not too wide)
- Use the drop shadow effect on the blending mode for more realistic impression
- Use the magic wand to eliminate unnecessary warna2
11. create a soft focus photo effect
- Go to our image file, press Ctrl + J to duplicate the layer
- Select a filter - gaussian blur, enter 5 pixels
- Select the layer mode: Overlay
12. create a stunning effect
- Open the image and copy to new layer
- Select a filter - gausian blur, enter a pixel on valuenya 13.0
- Set layer opacity to 50%
- Create a layer mask
- Select a brush dg 50% opacity, then brush into bagian2 object that will be maintained sharpness
13. make a quick sunset with the technique of gradient maps
- Open the image file
- Select new adjustment layer - gradient map
- Gradient menu will appear, select the one
- Enter the following values to set some color gradation
tab stops 1: # 000000; Location: 0%
tab stop 2: # 330000; Location: 41%
tab stops 3: # ff7c00; Location: 70%
tab stop 4: # f8eee4; Location: 100%
- When I click ok
- Set the blending mode to overlay
14. create 3D photo effects and curved
- Create new documents, we prepare a canvas for our image, gradient fills b / w
- Insert our image into the new document
- Set the blending mode - drop shadow
- Select edit - transform - perspective, set the direction in accordance with what we want
- Select a filter - distort, set the direction of the arch photo
15. Maintaining the color of objects in gray mode (black and white but there is a colored object)
- Open the image files we
- Select New Adjustment Layer - Channel Mixer
- Make sure the check box Monochrome active to make our image into grayscale
- Use a paint brush to polish the object you want displayed color
- Set opacitynya to create soft color
16. smooth the skin with the history brush
- Open the image files that will be refined
- Select a filter - gaussian blur - 8.0 pixel fill, our pictures will be blurry, while let
- Open to history, then click on the little arrow icon, select a history option, for this purpose, select the Allow non-linear history, With this, the steps that we created earlier, will not be lost
- Select new snapshot, this snapshot will become layer 'hidden', which will save the history of the gaussian blur filter that has been done previously.
- Click the new snapshot that emerged icon toolbrush history
- Still at the history, click the initial snapshot, this section MUST exist on the new snapshot
- Click the history brush tool, set the opacity to 40%, then start working the skin, set brushnya as needed.
17. make a heart shape with photographic images
- Open the image files that we want
- In the shape tool, choose the custom shape tool, make sure the choice of paths
- Select the desired shape form, eg liver
- After diapply on the layer, select Make Selection on the path palette
- Press Ctrl + X to cut options
- Open new document
- Paste form or shape that has been dicut
- Add a blending mode for the drop shadow and inner glow and finally stroke
18. turning photos into comic images
- Open the image files we
- Duplicate our layer by pressing Ctrl + J
- On a new layer, select the Color Dodge mode
- Press Ctrl + I to Inverse
- Select a filter - gaussian blur - enter the value 7
- Create a Threshold Adjustment Layer
- Enter the threshold level to 234
- Create a new layer Ctrl + Shift + Alt + N
- Change the blending mode to Multiply
- Select colors to begin painting with the brush tool
- To make titik2nya, select filter - sketch - halftone pattern, enter the value: size = 2, contrast = 50, type = dot pattern
19. create effect vehicle speed
- Open the car photo
- Duplicate the background layer
- Select a filter - motion blur, enter the number 3 on the corner, and 38 on its distance
- Create a layer mask on the new layer was
- Use the brush tool to reveal a picture of his car, while the background images will still look blur
20. make pixelate photo
- Open picture
- Duplicate the layer by pressing Ctrl + J
- On a new layer choose filter - texture - patchwork
- Enter the square size = 1, and reliefs = 0
21. copy the object by masking techniques (copying a particular section)
- Open image
- Copy layer as usual
- On a new layer, enter quick mask mode (press Q)
- Use a paint brush to paint the object to be copied
- If you've finished all, return to normal mode
- Will show the selection of the objects painted
- Press Ctrl + X or Ctrl + C to take part
22. create the effect of sunlight
- As usual, we need the image file, open file
- Create a new layer of background
- Select Filter - Render - Lens Flare
- Enter the brightness between 100-120%
- Select the appropriate type of lens
- Click Ok
23. make the fading effect
- Open the two images, eg scenery and photos closeup photos
- Insert closeup photos into the photo scene
- Use the eraser and magictool to remove the unwanted closeup photos
- Click the Add Vector Mask
- Select Gradient Tool Black to White
- Use from left to right
24. make custom brushes for abstract images
The first step, we make first brushnya
- Select new document, 500 x 500 pixel
- Select a filter - render - 3D Clouds
- Create a new layer, new adjustment layer, gradient map, select a suitable
- Select a filter - distort - Twirl, select less than 230 degrees
- Select a magic wand, tolerance 32-pixel
- Take shape as needed
- Choose select feather, fill with 6 pixel
- Select edit - define brush preset
25. The second step, the brush is ready for use
- Create a new document again
- Select a brush, set the master diameter to be 265
- Set options for shape dynamics, air brush, smoothing
- 100% set size jitter, angle jitter 100%
- Start by drawing on canvas
26. create text-style strawberry
first we make first patternnya
- Open a new file with size 100x100pixel
- Sets the fill color to D01111 and fill the new layer constrained
- Change the foreground color to be f2ea70
- Use the ellipse tool to draw a strawberry biji2
- Select blending options, outer glow, opacity set to 50%
- Duplicate layer until all the background filled with strawberries biji2
- If already selected edit-define pattern and name patternnya
27. then we will make the text
- Open a new file for example with dimensions 350x180
- Select the desired letter and make his writing
- Select a blending mode, Drop Shadow - Multiply with opacity of 30%
- Select Inner Shadow, set the color to be 870D0D
- Select Inner Glow, set the opacity to 75%
- Select bevel and emboss, select inner bevel-smooth with a depth of 100%
- Select pattern overlay, and enter the strawberry pattern that we have created earlier.
28. make gold text
- Enter the text you want and give color e1b917
- Blending modes, drop shadow, select opacitynya 50%
- Select inner shadow, modes: color dodge, color dabb0f
- Select bevel and emboss, select emboss with smooth technique with a depth of 90%, then select the shadow mode: Multiply by color 8a7410
- Select a satin, blend modes linear light with color 473b09
29. insert image in the text
the end result, our text will be colored with the image we prepared, steps:
- Open imagenya, then type any text
- On the text layer, press Ctrl + Click to select all text
- Select the image layer and press Ctrl + C and Ctrl + V
- Delete the text layer and the layer image
thanks to all who have visited this blogif there are additional you can post here